Salsify Integration
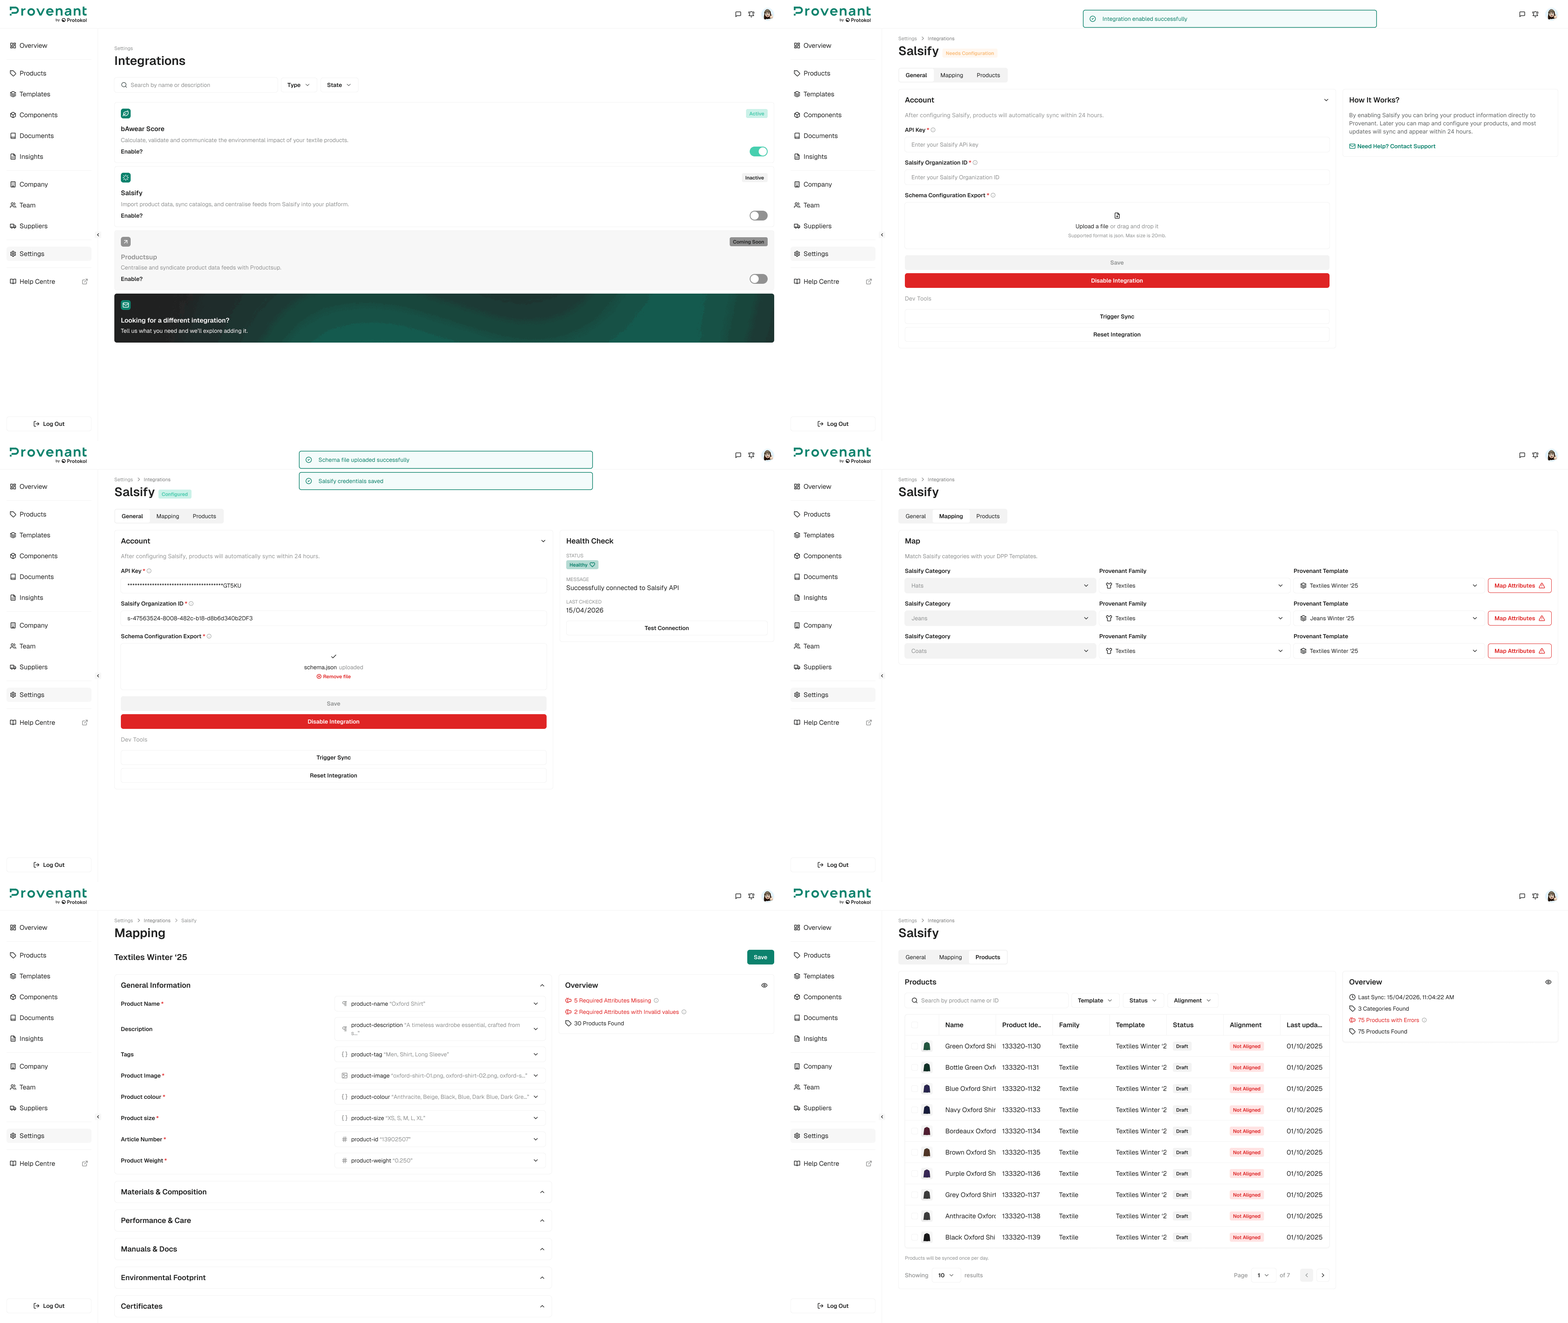
The Salsify integration brings product information from Salsify directly into Provenant. Once connected, your Salsify catalogue is mapped onto your DPP templates and products sync automatically every 24 hours. Most updates made in Salsify will appear in Provenant within that window.
Before you start
From your Salsify workspace you will need three things:
- Your
Salsify API Key. - Your
Salsify Organisation ID(format:s-<uuid>). - A Schema Configuration export of your Salsify organisation
.json.
The steps below explain where to find each one.
Get your Salsify API Key
- Sign in to
Salsify. - Open your user menu (top right) and select
My Profile. - Open the
API Accesstab. - Copy the
API Key. If no key is shown, clickRegenerateto create one.
Get your Salsify Organisation ID
- The
Organisation IDis the identifier of your Salsify workspace. It starts with s- followed by a UUID (for example, s-391d3e02-80d8-482c-b1f8-d866d34ea4b4) and is visible in the Salsify URL: app.salsify.com/app/orgs/organisation-id/… - You can also reach it from the
organisation menu(top right) ›Manage this organisation. The ID appears in the URL of that page.
Download the Schema Configuration
- In Salsify, open the organisation menu (top right) and select
Manage this organisation. - In the left navigation, open
Data. - On the Data Export screen, find
Schema Configurationand clickjson. - Wait for the export to finish. Salsify shows “Your export has finished and is downloading in the background - you can also download the results here.” The .json file is
downloadedto your computer.
Enable the integration
Steps
- In Provenant, open
Settings›Integrationsand clickSalsify. - On the
Generaltab, paste your API Key into the API Key field. - Paste your
Salsify Organisation IDinto the Salsify Organisation ID field. - Upload the Schema Configuration .json file you downloaded from Salsify (drag and drop or click the upload area). Supported format:
.json. Maximum size:20 MB. - Click Save.
When the credentials and schema are accepted, Provenant shows the toasts “Schema file uploaded successfully” and “Salsify credentials saved”, and the page header updates from “Needs Configuration” to “Configured”.
Health Check
Once the integration is configured, a Health Check panel is shown on the right side of the General tab:
Status– Healthy when Provenant can reach Salsify with the provided credentials.Message– A short description (for example, “Successfully connected to Salsify API”).Last Checked– Timestamp of the most recent health check.Test Connection– Run a check on demand to confirm the integration is still reachable.
Map Salsify to your DPP templates
After credentials are saved, open the Mapping tab to match Salsify categories with the Provenant Families and Templates that should be used when products are imported.
Map a category
Each row on the Mapping tab represents a Salsify category. For each category you want to import:
- Open the
Provenant Familydropdown and choose the family that best fits the Salsify category. The dropdown is searchable. - Open the
Provenant Templatedropdown and choose the template to use for products in this category. - Click
Map Attributesto open the attribute mapping screen for that template.
Salsify categories that you do not map are skipped during sync.
Map attributes
The Attribute Mapping screen lists every field defined in the selected Provenant template, grouped by section (General Information, Performance & Care, Environmental Footprint, Certificates, and any other sections defined in your template).
For each Provenant field, open the Select attribute dropdown and choose the Salsify attribute that should populate it. The dropdown is searchable, so you can type the first letters of the attribute name to filter the list.
Fields you do not map are left empty on imported products. Click Save when you are done.
Provenant confirms with the toast “Attribute mappings saved” and returns you to the Mapping tab, where the row now shows the configured Family and Template.
Run a sync
Once a category is mapped, products are kept in sync automatically: the platform runs a sync at least every 24 hours, and most updates made in Salsify appear in Provenant within that window.
Review synced products
Open the Products tab to see every product that has been pulled from Salsify.
The table shows:
- Name and Product ID.
- Family and Template assigned during mapping.
- Status of the product in Provenant (for example, Draft).
- Alignment status (for example, Partially Aligned).
- Last Updated.
Use the search field and the Template, Status, and Alignment filters to narrow the list.
Overview panel
The right side of the screen shows a summary of the latest sync:
Last Sync– Timestamp of the most recent sync run.Categories Found– Number of Salsify categories discovered.Products with Errors– Click the row to open the Sync Errors modal and review the products that failed to import.Products Found– Number of products successfully created in Provenant.
Sync Errors
The Sync Errors modal lists products that failed during the latest sync run, along with the reason. A common error is no_mapping No template mapping for category: <category>, which means the Salsify category of that product is not mapped on the Mapping tab. Add the missing mapping and re-run the sync to recover those products.
Synced products in your catalogue
Products imported from Salsify also appear in the regular Products list. On a product's Model Overview, a badge next to the title (for example, Salsify - hats) indicates that the model originated from Salsify and shows the template used for the import.
From there you can edit the model, manage its DPP, and publish it just like any other Provenant product. Field values mapped from Salsify are populated automatically and are refreshed on each sync.
Manage the integration
From the General tab you can also:
Upload New Schema File(optional) – Replace the current schema with an updated export from Salsify when your Salsify configuration changes. The currently active schema is shown above this control with its filename and upload date.Disable Integration– Stop the integration. Syncs stop and the Salsify badge remains on existing products, but no new data is pulled.